

Required permission:
- View integration
- Create integration (to connect)
- Edit integration (to change the Login URL or certificate)
- Delete integration (to disconnect)
Before you begin
- A Microsoft Entra ID subscription with an administrator account.
- Access to Settings › Integration in the web app, with the permissions above.
- An enterprise application registered in Entra ID for the web app. Step 1 below creates it.
Step 1: Register the app in Entra ID
- Sign in to the Azure portal.
- Go to Microsoft Entra ID › Enterprise applications › All applications and click New application.
- Click Create your own application, enter a name (for example, the name your team knows the app by), choose Integrate any other application you don’t find in the gallery (Non-gallery), and click Create.
Step 2: Set up SAML in Entra ID
- Open the application you just created from Enterprise applications.
- In the left menu click Single sign-on, then choose SAML.
- In Basic SAML Configuration, click Edit.
- Enter an Identifier (Entity ID), for example
https://your-app-url.com. Note it down; it identifies the app as the service provider. - Click Add reply URL and enter the Reply URL (Assertion Consumer Service URL) where the sign-in response is posted, for example
https://your-app-url.com/auth/sso. - Click Save and close Basic SAML Configuration.
- Scroll down to the Set up section for your application and copy the Login URL. You paste it into the web app in Step 3.
- In SAML Signing Certificate, download Certificate (Base64). You upload it in Step 3.
Step 3: Connect Entra ID in the web app
Open Settings › Integration and click Connect on the Microsoft Entra ID card.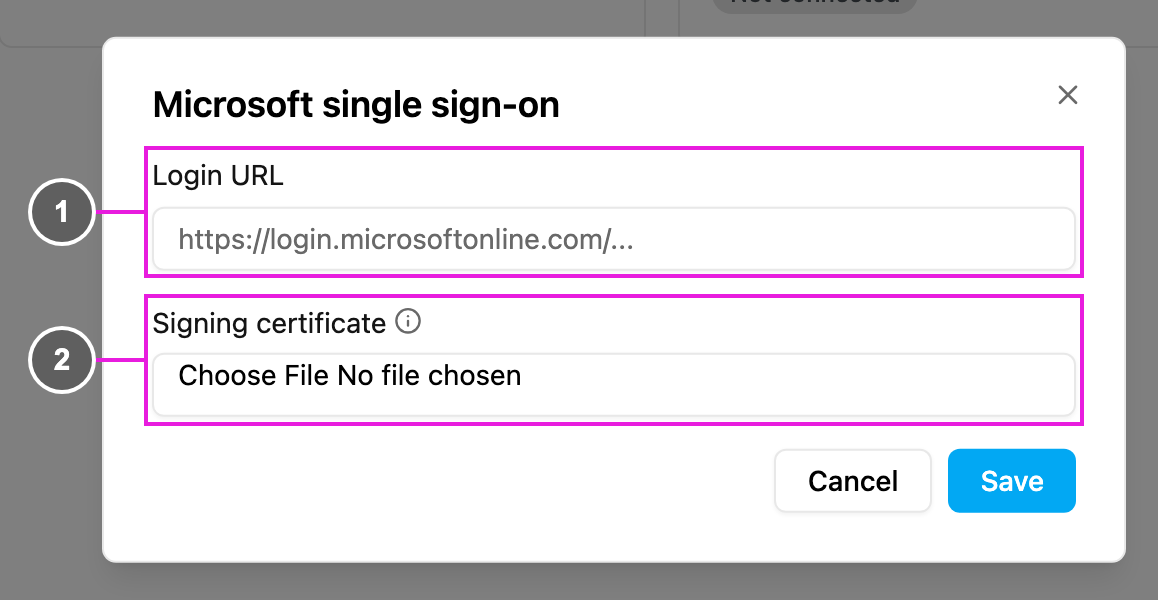
- Login URL: paste the Login URL you copied from Entra ID. It must be the full
https://address, for examplehttps://login.microsoftonline.com/...; otherwise you see Write the full https address your directory gave you. - Signing certificate: choose the certificate file you downloaded, as a
.cer,.pemor.crtfile. It’s required when you connect for the first time.
Step 4: Give people access in Entra ID
Only people assigned to the application in Entra ID can sign in with it.- In the application in Entra ID, open Users and groups.
- Click Add user/group and pick the people or groups who should be able to sign in.
Signing in with Microsoft
Once the setup is done, people sign in through their Microsoft portal:- Open office.com and sign in with the Microsoft account.
- Click the App launcher (the grid icon).
- Choose the application you registered in Step 1. The web app opens, signed in.
Good to know
- Accounts are matched by email. If someone already has an account in the web app, the email in Entra ID must be the same for SSO to sign them in to that account. A different email in Entra ID is treated as a different account.
- Invited but not verified. If someone was invited in the web app but hasn’t finished the email verification, they can’t sign in through Entra ID with the same email until they do. Either finish the verification from the invitation email, or delete the unverified user on Settings › User so Entra ID sign-in can create the account.
- Passwords still work. People who sign in with Entra ID can still set a password in the web app and use it on the normal sign-in page.
- Disconnecting stops Microsoft sign-in at once. Accounts stay, and people with a password can still sign in with it.