> ## Documentation Index
> Fetch the complete documentation index at: https://docsv4.mile.app/llms.txt
> Use this file to discover all available pages before exploring further.
# Webhook
> Send the event's data to a URL of your own system as an HTTP POST.
**Webhook** sends the data of the event to a URL as an HTTP **POST** with a JSON body. It connects your workflow to anything else: an ERP, CRM, WMS, billing system, dashboard or chat channel.
Webhook is available for **every event**, and it's the only automation type for On Start Trip, On Finish Trip, On Geofence Entry, On Geofence Leave, On Routing Finished and On Routing Dispatched.
Required permission:
* View automation
* Create automation
## Automation detail
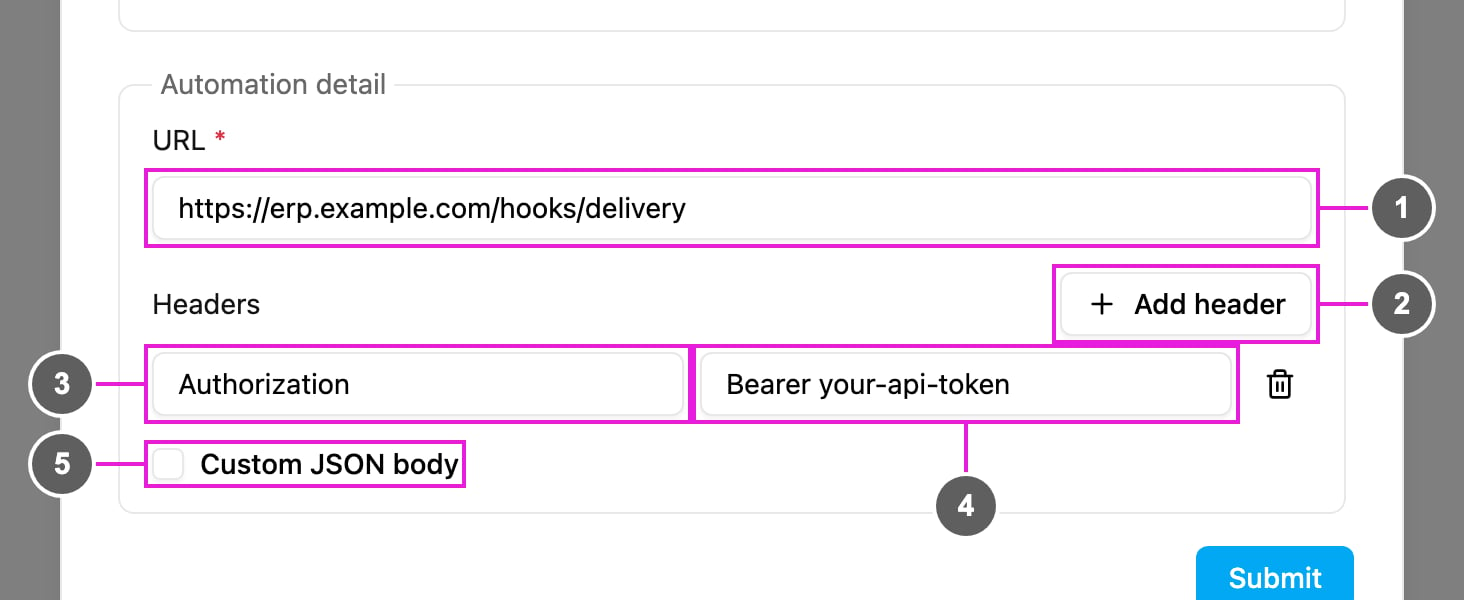
1. **URL**: required. Where the request is sent, for example `https://erp.example.com/hooks/delivery`. It must be reachable from the internet and accept POST requests. Use HTTPS.
2. **Add header**: add a header to the request. Without headers, the text "No header. The request is sent as-is." is shown.
3. **Header name**, for example `Authorization`.
4. **Header value**, for example `Bearer your-api-token`. The trash icon removes the header.
5. **Custom JSON body**: tick to replace the default body with your own JSON. See [Custom JSON body](#custom-json-body).
The request is always a POST; there is no method to choose.
Common headers:
| Header | Value | Purpose |
| - | - | - |
| `Authorization` | `Bearer your-api-token` | Authentication |
| `Content-Type` | `application/json` | The body is JSON |
| `X-API-Key` | `your-api-key` | Key-based authentication |
| `X-Custom-Header` | `custom-value` | Anything your endpoint needs |
## Default body
Without a custom body, the request body is the record that started the automation.
**Task events** (On Task Created, On Task Assigned, On Task Finished): the task with all its fields.
```json theme={null}
{
"_id": "task_id_here",
"flow": "Delivery",
"flowId": "flow_id_here",
"status": "DONE",
"hubId": "hub_id_here",
"assignee": ["driver@example.com"],
"startTime": "2024-01-20T10:00:00.000Z",
"endTime": "2024-01-20T18:00:00.000Z",
"createdBy": "admin@example.com",
"createdTime": "2024-01-20T09:30:00.000Z",
"organizationId": "org_id_here",
"customerName": "Budi Santoso",
"customerAddress": "Jl. Sudirman No. 123, Jakarta",
"deliveryCoordinate": "-6.2088,106.8456"
}
```
**On Data Source Created**: the record with all its fields.
```json theme={null}
{
"_id": "data_id_here",
"dataType": "Customer",
"dataTypeId": "datatype_id_here",
"organizationId": "org_id_here",
"createdTime": "2024-01-20T09:30:00.000Z",
"name": "Budi Santoso",
"email": "budi@example.com"
}
```
**Routing events** (On Routing Finished, On Routing Dispatched): the routing result.
```json theme={null}
{
"_id": "routing_id_here",
"name": "Route Plan Name",
"status": "FINISHED",
"organizationId": "org_id_here",
"createdTime": "2024-01-20T09:30:00.000Z",
"vehicles": ["..."],
"visits": ["..."]
}
```
**Trip and geofence events**: see [On Start Trip](/pages/workflow/automation/events/on-start-trip#webhook-payload), [On Finish Trip](/pages/workflow/automation/events/on-finish-trip#webhook-payload) and [On Geofence Entry](/pages/workflow/automation/events/on-geofence-entry#webhook-payload).
## Custom JSON body
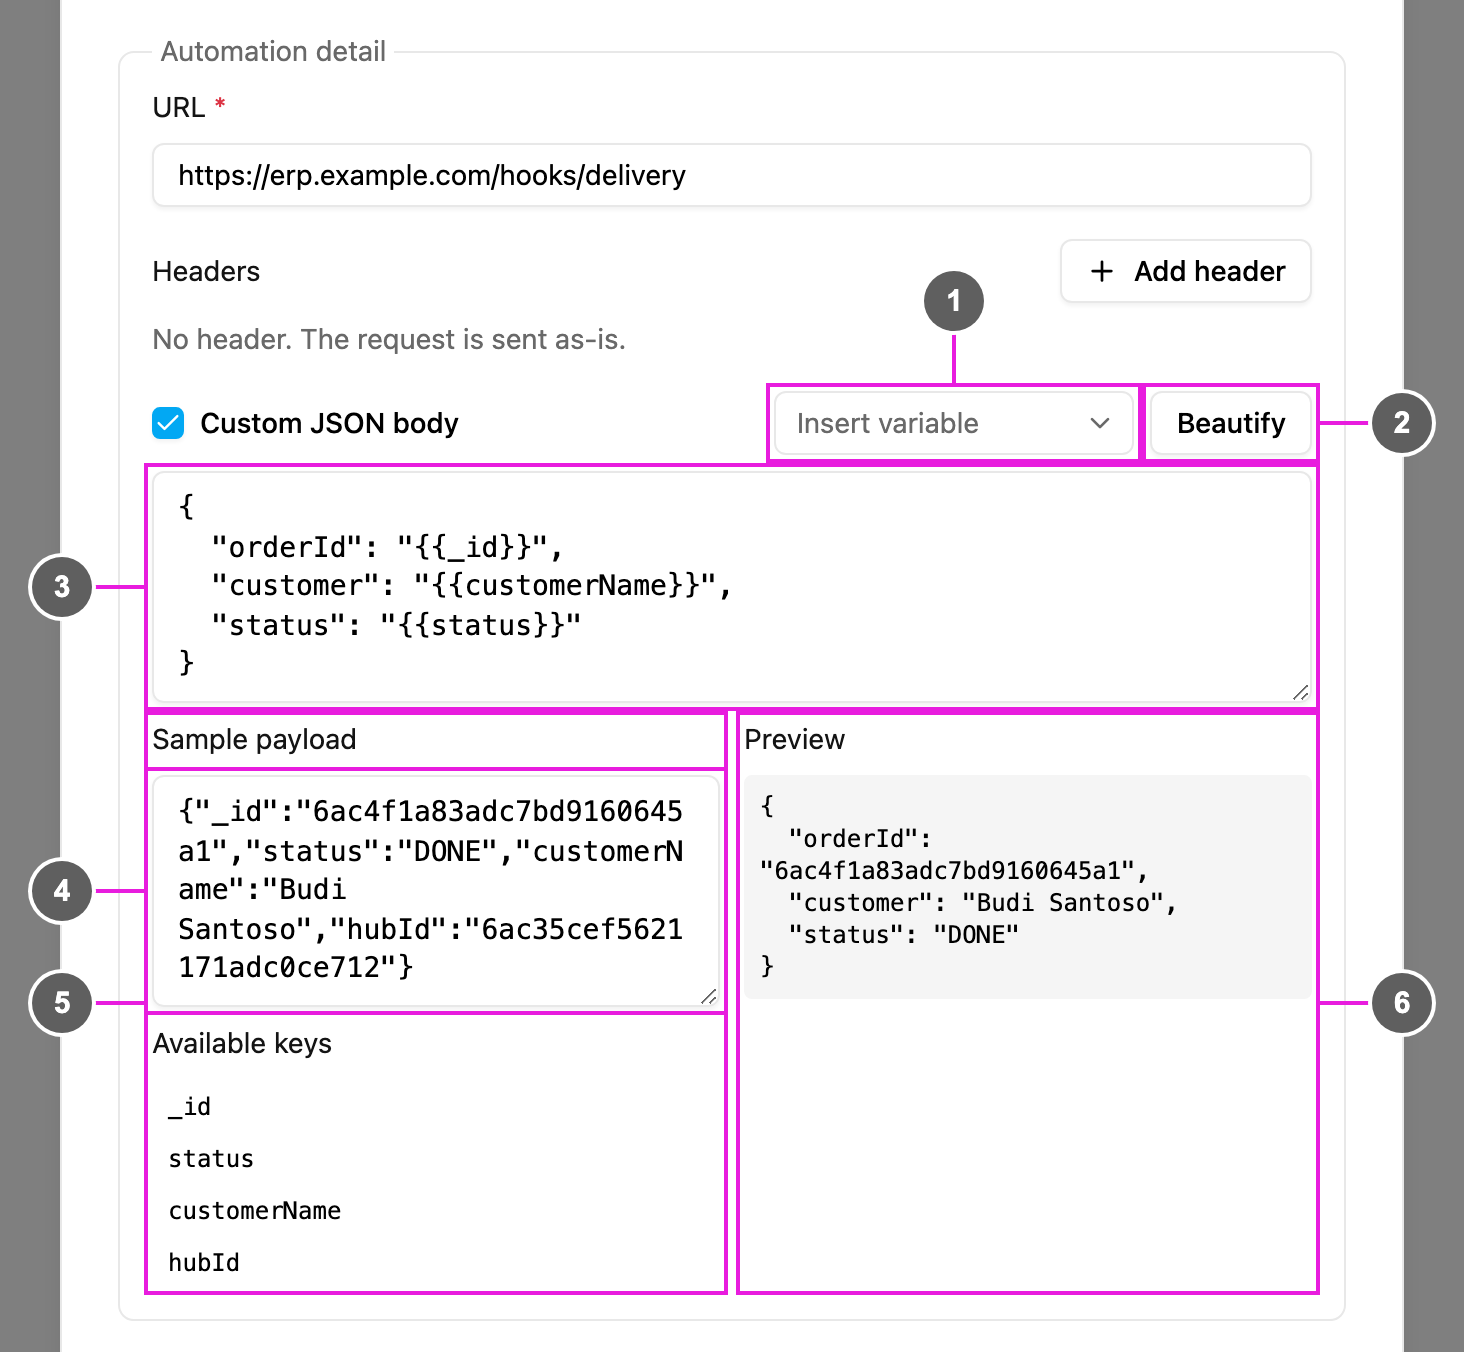
Tick **Custom JSON body** to send your own JSON instead, with values from the event filled in.
1. **Insert variable**: pick a field of the trigger's task type to insert its placeholder at the cursor.
2. **Beautify**: format the JSON. If the text isn't valid JSON yet, "Cannot format — not valid JSON" is shown.
3. **Custom JSON body**: the body to send. Write a value as `{{key}}` to have it replaced with the event's value when the automation runs, for example `"customer": "{{customerName}}"`.
4. **Sample payload**: paste an example of the default body, for example copied from the [log](/pages/workflow/automation/log). It's only used to help you write the body and is not saved.
5. **Available keys**: the keys found in the sample payload. Click one to insert it at the cursor. Nested keys are written with dots, for example `hub.name`.
6. **Preview**: the body as it would be sent for the sample payload. Keys that the sample doesn't contain are listed as `undefined: ...`.
Example:
| Custom JSON body | Sample payload | Preview |
| - | - | - |
| `{ "orderId": "{{_id}}", "customer": "{{customerName}}", "status": "{{status}}" }` | `{ "_id": "6ac4f1a83adc7bd9160645a1", "status": "DONE", "customerName": "Budi Santoso" }` | `{ "orderId": "6ac4f1a83adc7bd9160645a1", "customer": "Budi Santoso", "status": "DONE" }` |
Untick **Custom JSON body** to go back to the default body.
## How it works
1. The event happens and the [rules](/pages/workflow/automation/rules), if any, are checked.
2. The body is prepared: the default record, or your custom body with its placeholders filled in.
3. Your headers are added.
4. The POST request is sent to the URL.
5. The request, your endpoint's status code and its response are recorded in the [log](/pages/workflow/automation/log), where failed requests can be retried.
## Examples
| Scenario | Event | URL | Headers / rules |
| - | - | - | - |
| ERP sync | On Task Finished (Delivery) | `https://erp.example.com/api/deliveries/complete` | `Authorization: Bearer ...`, `Content-Type: application/json` |
| Chat alert for urgent tasks | On Task Created (Urgent Delivery) | your chat app's incoming-webhook URL | Rule: Priority = High |
| Live dashboard | On Routing Dispatched | `https://dashboard.example.com/api/routes/update` | `X-API-Key: ...` |
| CRM contacts | On Data Source Created (Customer) | `https://api.crm.example.com/contacts/create` | `Authorization: Bearer ...` |
| Invoicing | On Task Finished (Delivery) | `https://billing.example.com/api/invoices` | `X-Billing-Key: ...` |
## Security
* Always use **HTTPS** so the data is encrypted in transit.
* Protect your endpoint with an `Authorization` header or an API key, and check it on every request.
* Validate the body's structure on your side.
* Rotate keys regularly and keep them out of shared documents.
* If your firewall allows it, accept requests only from known addresses.
## Good practice
* Test your endpoint before switching the automation on.
* Answer quickly with a 2xx status and do heavy work in the background.
* Make your endpoint idempotent, using the record's `_id`, so a retried or repeated request does no harm.
* Use [rules](/pages/workflow/automation/rules) to send only what your system needs.
* One automation sends to one URL. To send to several, create one automation per URL.
## Troubleshooting
**Nothing is sent.**
* Check that the automation is **Active**, its event and task type match, and the rules don't exclude the record.
* Check that the URL is valid and reachable from the internet.
**Your endpoint returns an error.** Open the run in the [log](/pages/workflow/automation/log) to see the request and the response; check the authentication header and the body your endpoint expects.
**The request times out.** Your endpoint takes too long. Answer with 200 at once and process the data afterwards; check that the endpoint is up.
**You receive duplicates.** Look for several automations on the same event, speed up your endpoint so it isn't retried, and use the `_id` to ignore repeats.
## Questions
**Which HTTP method is used?** Always POST, with a JSON body.
**Are failed webhooks retried?** Failed runs stay in the [log](/pages/workflow/automation/log), where you can retry one or repush several at once. Delivery is not guaranteed while your endpoint is down.
**Can I use HTTP instead of HTTPS?** It works, but it's strongly discouraged.
This documentation is built and hosted on [Mintlify](https://mintlify.com), a developer documentation platform.