> ## Documentation Index
> Fetch the complete documentation index at: https://docsv4.mile.app/llms.txt
> Use this file to discover all available pages before exploring further.
# Custom Module
> Add your own web pages, field app pages and plugins to the app's menus, with a secure {SHORT_TOKEN} sign-in for external services.
A **custom module** puts a page built for your organization into the app's menu. Click it and the page opens, without anyone needing to know or bookmark its address. There are three types:
| Type | Where it appears | What it opens |
| - | - | - |
| **Web** | The web app's sidebar | A web address, in a new tab or the current tab. |
| **Mobile** | The field app's menu | A web address, inside the field app. |
| **Plugin** | The web app's sidebar | An uploaded bundle that runs inside the web app. Offered to selected accounts only. |
Every custom module gets its own permission, so you decide which roles see it. See [Permission for each module](#permission-for-each-module).
Required permission:
* View custom module
* Create custom module (to add)
* Edit custom module (to change)
* Delete custom module (to delete)
## The custom module list
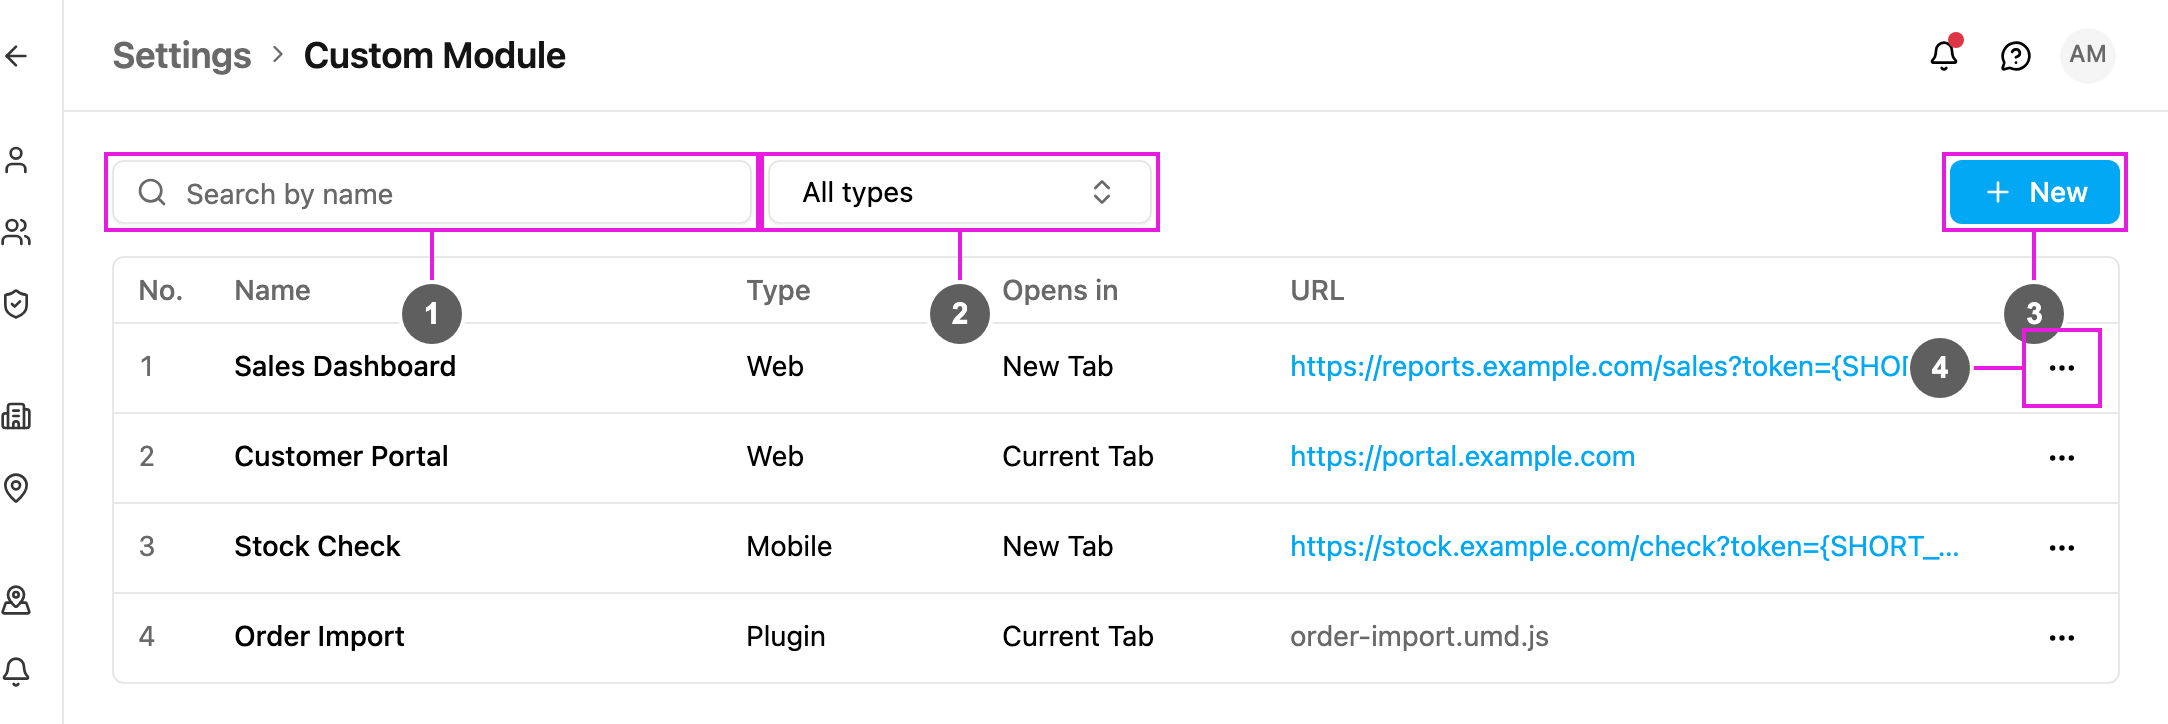
Open **Settings › Custom Module**.
1. **Search by name**: narrows the list to modules whose name contains what you type.
2. **All types**: shows only **Web**, **Mobile** or **Plugin** modules. Pick more than one to combine them.
3. **New**: adds a module. See [Add a custom module](#add-a-custom-module).
4. **...** (More actions): **Edit** or **Delete** the module.
The list has these columns:
| Column | What it shows |
| - | - |
| **No.** | The row number. |
| **Name** | The module's name, as created. |
| **Type** | **Web**, **Mobile** or **Plugin**. |
| **Opens in** | **New Tab** or **Current Tab**. |
| **URL** | The address the module opens; click it to try it. A **Plugin** shows its uploaded bundle file instead. |
With no modules yet the page reads *No custom modules yet*. If your search and type filter match nothing, it reads *No module matches those filters*.
## Add a custom module
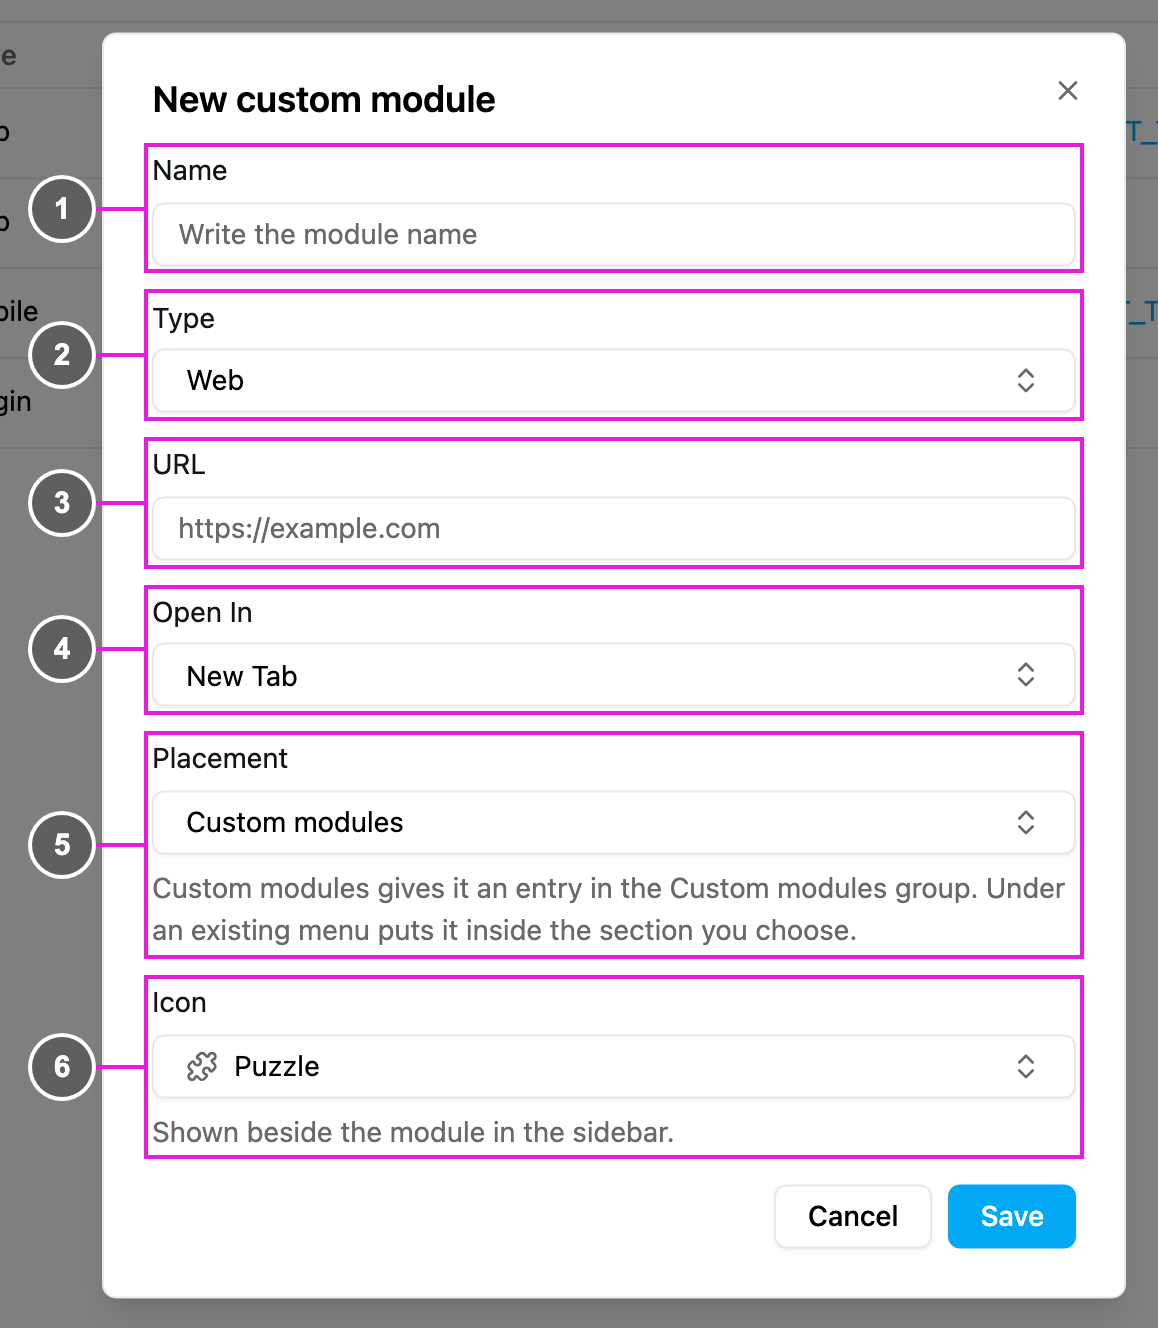
Click **New**. The fields change with the **Type** you choose.
1. **Name**: the name shown in the menu, and the name of the module's permission. Required. Avoid a name already used by a menu in the app. It can't be changed after the module is created.
2. **Type**: **Web**, **Mobile** or **Plugin**. See the table above.
3. **URL**: the full address the module opens, starting with `http://` or `https://`, for example `https://reports.example.com/sales`. You can add `{SHORT_TOKEN}` to it: see [Sign in to your service with SHORT\_TOKEN](#sign-in-to-your-service-with-short_token). **Web** and **Mobile** only.
4. **Open In**: **New Tab** (the default) or **Current Tab**. **Web** only.
5. **Placement**: where the module appears in the sidebar. **Web** and **Plugin** only.
* **Custom modules**: its own entry in the **Custom modules** group of the sidebar.
* **Under an existing menu**: inside a section you choose in **Sits under**, for example under your task pages. It shows as a text entry without an icon. **Sits under** is required with this placement.
6. **Icon**: the icon shown beside the module in the sidebar, for example **Puzzle**. Only with **Custom modules** placement.
A **Mobile** module only needs **Name**, **Type** and **URL**: it appears in the field app's menu, and the sidebar options don't apply to it.
Click **Save**. The toast *Module … created* confirms it, and the module appears in the menu for everyone whose role has its permission.
### Plugin fields
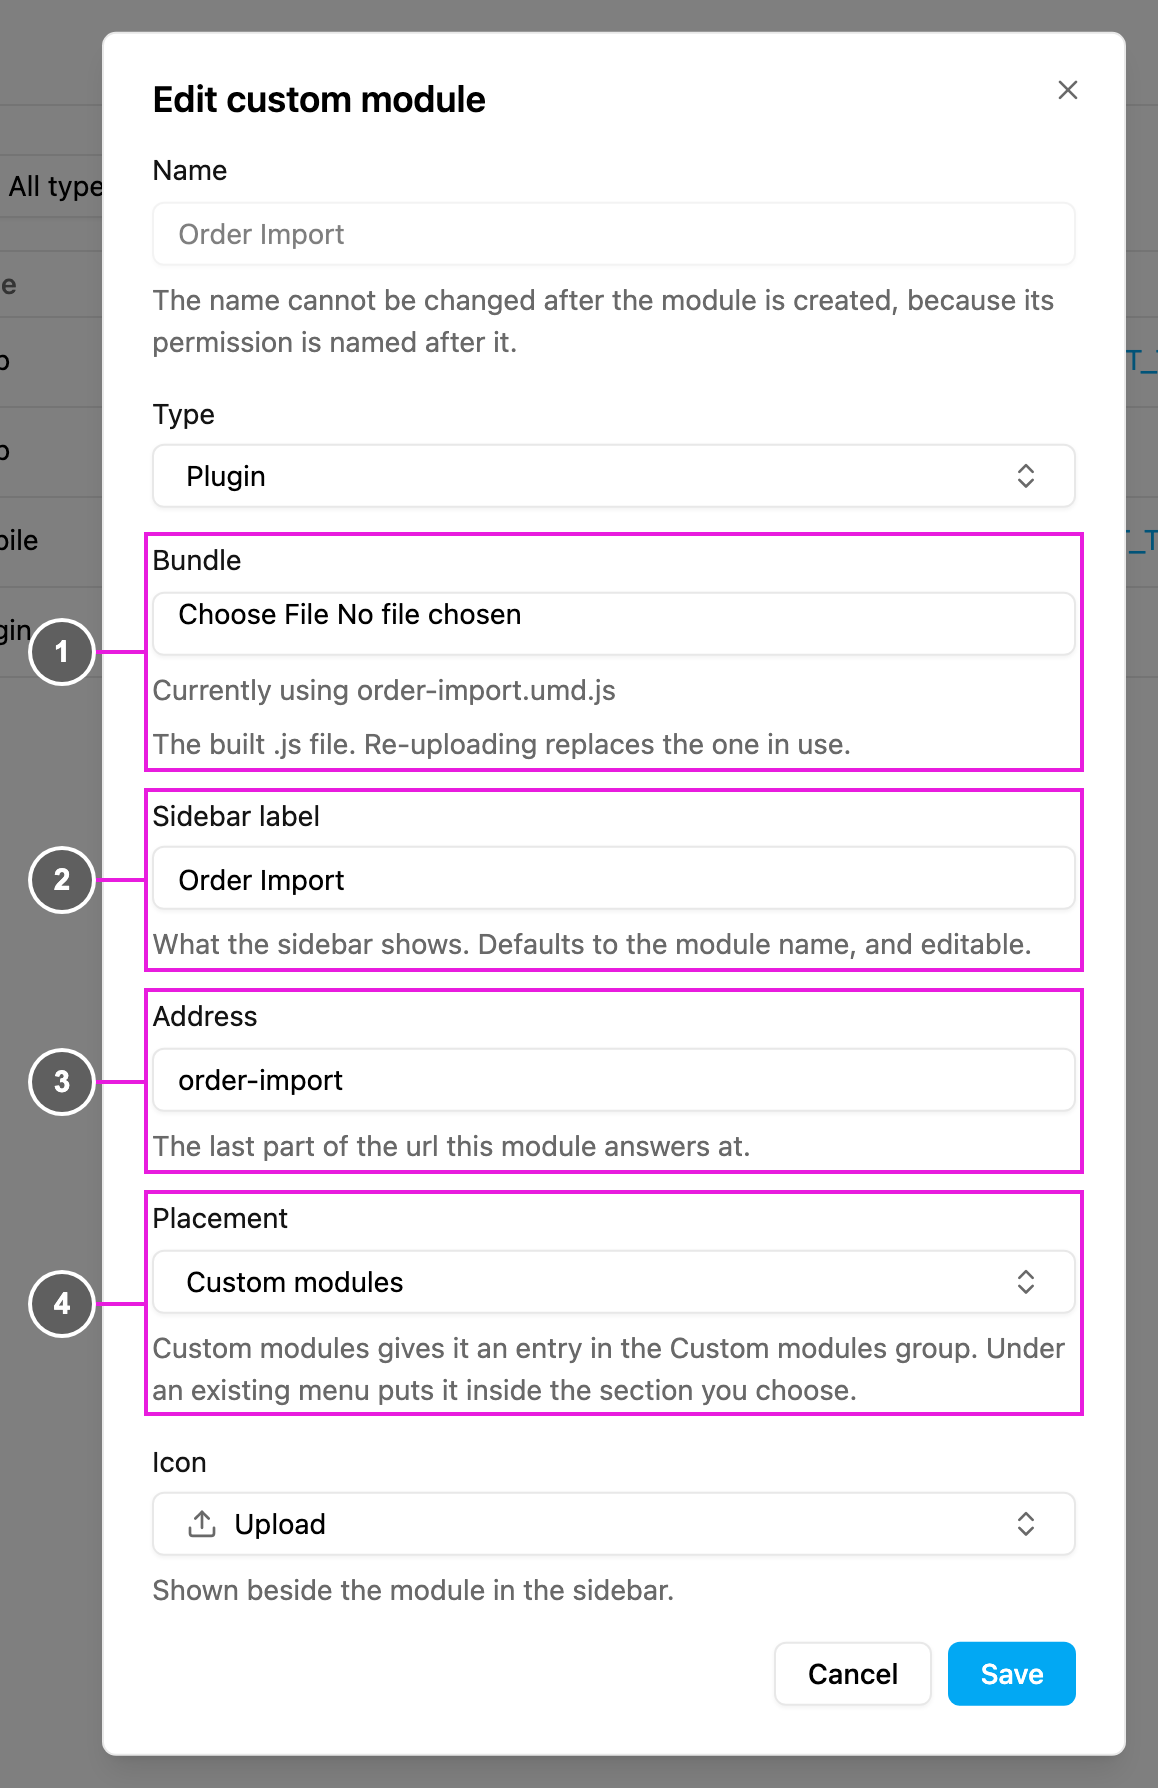
A **Plugin** runs a JavaScript bundle inside the web app instead of opening an address. It is offered to selected accounts only; other accounts don't see the **Plugin** type and can't edit or delete existing plugins.
1. **Bundle**: the built `.js` file to upload. Required for a new plugin. When editing, *Currently using …* names the file in use; choose a new file only to replace it.
2. **Sidebar label**: what the sidebar shows. It is filled in from the bundle, defaults to the module name, and you can change it, unlike **Name**.
3. **Address**: the last part of the web address the plugin opens at, for example `order-import`. It is filled in from the bundle, and lowercase letters, numbers and hyphens are kept. If another module already uses it, you see *Another module already answers at this address.*
4. **Placement**: **Custom modules** or **Under an existing menu**, as for a **Web** module, with **Icon** or **Sits under** below it.
A plugin always opens inside the app, so it has no **URL** or **Open In**.
## Sign in to your service with SHORT\_TOKEN
When a module's **URL** points at your own service and that service needs to know who opened it, put the placeholder `{SHORT_TOKEN}` in the URL where the service expects a credential:
```
https://reports.example.com/sales?token={SHORT_TOKEN}
```
Each time someone clicks the module, the app creates a fresh, one-time **short token** for that person and puts it in place of `{SHORT_TOKEN}` before opening the address. The person's own sign-in token never appears in the address, so it can't leak into your service's logs, the browser history or anything in between.
**Why use it.** A sign-in token in an address stays valid for hours, and anyone who sees the address can use it. A short token expires after **5 minutes** and is only good for one exchange.
**What your service does with it.** If your service only needs to show something, it can ignore the token. If it needs to act for the person in the app, for example to update a task, it exchanges the short token straight away for that person's access token, user and organization through the API's short-token resolve endpoint, then uses that access token for its calls. An expired, unknown or malformed short token is refused: treat it as not signed in and don't retry. See the [API reference](https://apidoc.mile.app/).
Rules for your service:
* **Exchange it at once.** It expires after 5 minutes; don't queue it.
* **Treat it like a password.** Don't log it, store it or put it in error reports.
* **HTTPS only.**
A URL **without** `{SHORT_TOKEN}` is opened with the person's sign-in token added as a `token` parameter. Use `{SHORT_TOKEN}` for any address outside your organization's control.
## Edit a custom module
Required permission:
* View custom module
* Edit custom module
Open **...** on the module's row and choose **Edit**. You can change every field except **Name**: the name is locked because the module's permission is named after it. To rename a module, create a new one and delete the old one.
Click **Save**. The toast *Module … updated* confirms it. If you close the dialog with unsaved changes, *Discard your changes?* asks first; choose **Keep editing** to go back.
## Delete a custom module
Required permission:
* View custom module
* Delete custom module
Open **...** on the module's row and choose **Delete**. *Delete …?* warns that the module disappears from the navigation and its permission is removed. Click **Delete** to confirm. This can't be undone.
## Permission for each module
Creating a custom module also creates a permission named after it, **View** followed by the module's name. For example, a module named **Sales Dashboard** gets **View Sales Dashboard**.
Turn it on for the roles that should see the module on [Settings › Permission](/pages/settings/permission/introduction). People whose role doesn't have it don't see the module in any menu.
This documentation is built and hosted on [Mintlify](https://mintlify.com), a developer documentation platform.